
How to Implement 2FA (and why you need it) on Your WordPress Website
Identity theft and hacking are up by 70%. That’s a crazy increase. This is why I have 2FA (Two-factor Authentication) on everything I can when the option is available, including all my WordPress websites.
2FA Before It’s Too Late
Two-factor authentication is one last step (albeit sometimes a PIA) that can prevent all kinds of data and identity theft compromises. Now that so much of your data is in databases, you need to take this critical step to do everything in your power to protect yourself.
Last year, someone accessed my business PayPal account and then added a Visa gift card. They then “filled” the gift card with funds from my PayPal balance. PayPal has since upgraded its security.
It was like they had not seen that one coming. PayPal admitted it should never have happened without my confirmation as the account owner. That’s the thing with technology: something new can happen at any time, and you have to react—fast.
WordPress Websites and 2FA
The last thing you want is for your website to be compromised where your server and resources are used for nefarious activities. Or your customer data gets swiped — that’s a big-time liability issue.
Scammers and hackers tend to target the little guys because they know they tend to not set up security properly. So, let’s get you all set up and secure!
WordPress Security is a Thing
When it comes to my WordPress websites, they are locked down because that is in my control to control. Not infallible, nothing is, but I have the peace of mind of knowing I’ve covered all the bases that I can.
When I login to a site that doesn’t have 2FA in place, I immediately make that recommendation. But recommending doesn’t mean they follow through.
Is it because there is an extra step to look at your phone and type in a code? That extra step is the exact thing that prevents strangers from accessing your data.
Believe me, if your site gets compromised, you’ll look at those extra steps differently. After having to go through a site recovery, 2FA will be something you actually enjoy.
Compromising WordPress Websites
Your WordPress website can be compromised in two ways: on the server side and through your dashboard. The first is through hosting, and the second is through your setup choices.
This is where a quality host comes into play. A website host is responsible for securing their servers and network. One of the easiest things you can do is have a complicated and long password to access your hosting and FTP accounts.
The same goes for your WordPress dashboard login. The more complex the password, the better.
If you don’t want to remember whacky passwords — check out LastPass. I have it on my desktop, tablet, and phone. Once a password is saved, I don’t have to worry about typing it in again.
Setting Up 2FA The Easy Way
By setting up 2FA to access your WordPress website’s dashboard, you and any other users you designate will need to enter the 2FA code sent only to their phones to gain access. Without that code, there will be no entry.
I install Wordfence on all the WordPress websites I work on. WordFence is a security plugin that allows you to monitor suspicious activity on your WordPress website. The 2FA settings are located in Wordfence > Login Security.
You’ll see two tabs: Two-factor Authentication and Settings. Let’s start with the Two-factor Authentication tab:
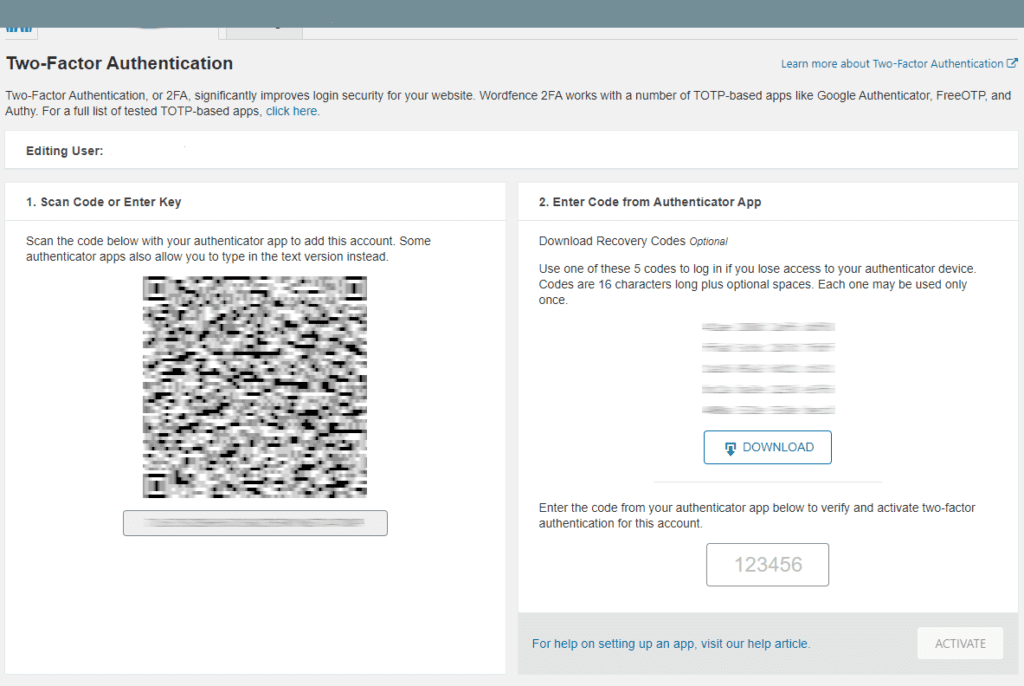
Once you are set up, when you login to your site, another step will appear to add the code from the app into the 2FA box. This code will refresh to a different code each time you log in.
You’ll notice an option to not ask for a login code for 30 days. Check that.
2FA Settings Tab
Go to the Settings tab, where the user summary notes if 2FA is active.
Safe and Secure
Review my article Tips to Secure Your WordPress Website for more tips to secure your WordPress website. Then, you can relax knowing that you added a security layer to ensure your WordPress dashboard can only be accessed by those you designate.
Remember, nothing is 100% guaranteed. However, adding 2FA combined with standard and customary security practices can dramatically minimize your risk.
At your service,

*Some of the links on this page are to companies with which I have a professional affiliation.
Read my complete affiliate statement here.
